I've made a variety of sizes - some with gussets, some with ribbon already attached - and I thought I'd share the how-to bit with you (not that it's at all difficult, but I know by the time we get this close to Christmas, my brain's ability to work anything out for itself is waning quickly, so a photo-tutorial can save a bit of head-scratching). I used French seams on my bags for neatness - you could do without them to save time, but in all honesty they only add about two and a half minutes to each bag.
Cut your fabric a little more that twice the size you want your finished bag to be. I didn't do any measuring - just made a selection of sizes. If you use a fabric such as gingham, you can just cut along the lines - super speedy!
Working with one of the short edges, fold over twice, press and pin. Do the same with the other short edge.
Sew a straight line along the folded edge, ensuring you catch the folded-under bit of fabric. My hems were about 3/8 inch - you could make them as wide or narrow as you please. I didn't bother backstitching at either end - the ends will be caught in the side seams anyway.
Fold your hemmed fabric in half, hemmed edges together, wrong sides facing. Press along the folded edge.
If attaching ribbons, tuck 1" of the ribbon in between the layers about 2" down from the hemmed edges. Pin all three layers together. Do the same on the other side. Sew straight lines down each edge, using a 1/4" seam allowance. When you've sewed both sides, you will have a bag that looks as though you've sewed it wrong side out as the raw edges will be on the outside. Your long pieces of ribbons should be on the outside of the bag.
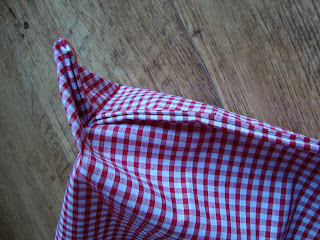
Now turn your bag inside out. It should look like the above photo, with 1" of ribbon sticking out of the neat edges. Press the sides of your bag so they're nice and flat.
Sew down each side again with a 3/8" seam allowance - this should ensure that your raw edges are now encased inside the new seams. As you approach the ribbon, check that the long tail is laying flat inside your bag.
Fold the short tail of ribbon over the fabric, so that as you continue your seam you sew down the tail. This keeps the inside of your bag nice and tidy and should stop the ribbon from fraying.
Do the same for the other side. This is what the inside of the bag will now look like.
If you want to add a gusset to the bottom of your bag so that it will stand up, pinch the corners of the bottom of the bag (whilst it's still inside out) and pull out so that you get a point.
Sew a straight line so that you have a triangle. Use your judgement as to how large your triangle should be - mine were about 1 1/2" wide.
This is what the bag looks like now, inside out.
Here's a close-up of the gusset corners.
Turn your bag right side out and admire your clever handiwork!
Pop a gift inside, wrap the ribbons round the top edge and tie. Beautiful!


They look great. I've done bags before, but never thought of the gusset corners. Thank you for showing that part!
ReplyDeleteI'm glad it was useful. Thanks for dropping by and happy holidays to you!
ReplyDelete